How to Create a Pop Up Video in Divi With a Call to Action Button Using Divi Overlays
Hey Divi fans! We’re back with another tutorial!
In this Divi tutorial, I’m going to show you how to use our plugin, Divi Overlays, to create a beautiful video popup with an animated call to action button. And as a bonus, this Divi Overlays layout can be downloaded for free from your Divi Life account page for all Divi Overlays customers. 🙂
This is a re-creation of the video popups that Elegant Themes has on their website, particularly on the Divi landing page. So to be clear, Elegant Themes gets 100% credit for the gorgeous design of this video popup with the CTA button!
This video is part one of a two part series. In part two, we’ll be re-creating the top section from the Divi landing page, and giving away the layout for free. The focus will be on the animated image hover effect, as well as the animated call to action button.
Okay, let’s dive in!
First, I’m going to show you how to download the layout from your Divi Life account, then we’ll upload, and then we’ll customize it!
Downloading the Layout from Your Divi Life Account
Navigate to your Divi Life Account > Downloads Tab, then find the download for the ET Pop Up Video With Call-to-Action Button, and click the file link to download directly.
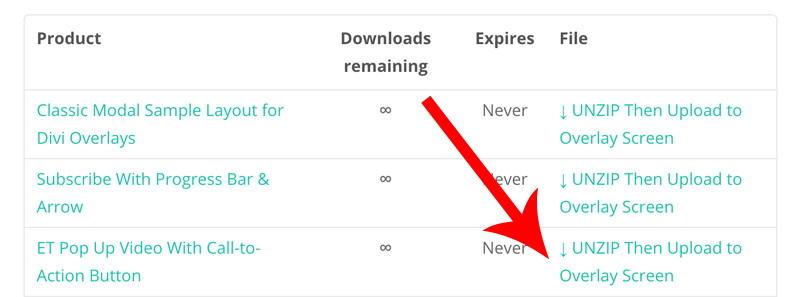
Next, unzip the .zip file so it will be ready to import in the next step.
Creating the Overlay, & Importing the Layout
Alright, assuming you’ve already installed and activated Divi Overlays, navigate to the Divi Overlays section in your WP Admin and click “Add New.” As a sidenote, if you’re brand new user of Divi Overlays, then I highly recommend taking a look at the Getting Started Guide for Divi Overlays.
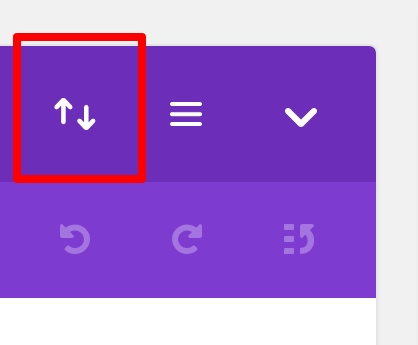
Next, give your overlay a name, and then click the big purple button to activate the Divi Builder. Next, we’ll import the freshly downloaded overlay layout by clicking on the portability icon in the top right hand corner.
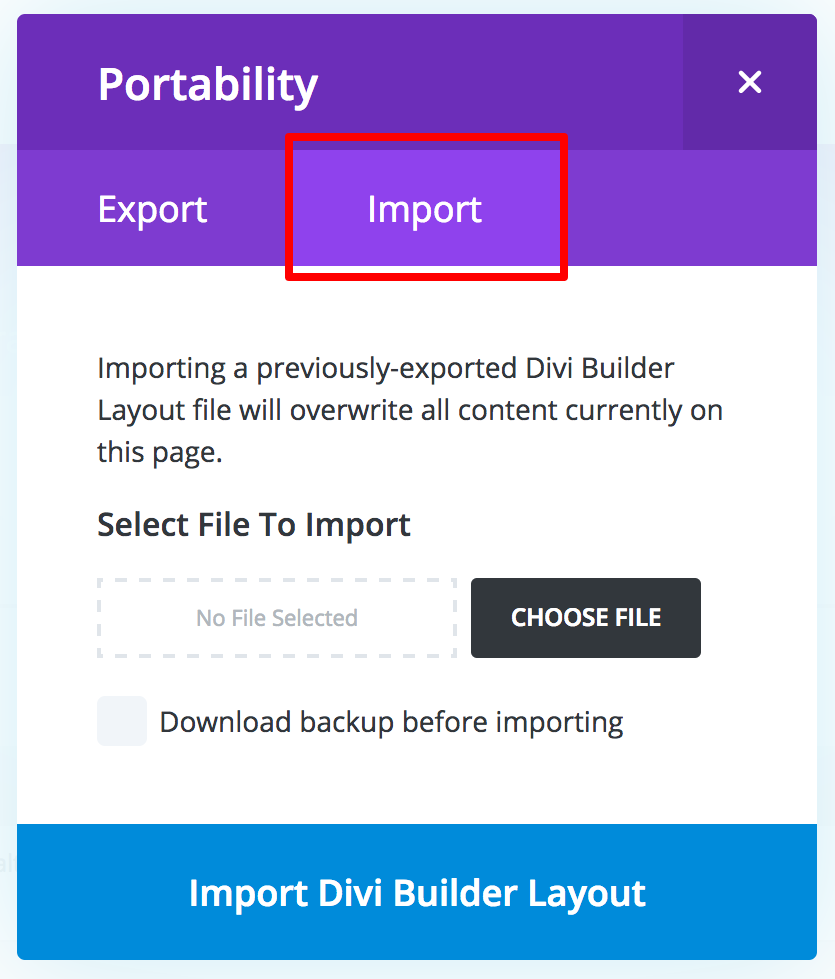
Now click over to the “Import” tab and select from your computer the layout you just downloaded and unzipped.
Okay so now the ET Pop Up Video with Call to Action Button layout is now imported to your overlay. There’s a few more quick steps we need to do before setting up the trigger.
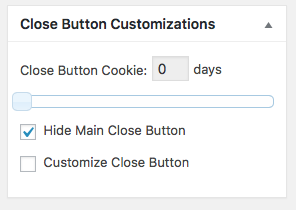
Firstly, find the “Hide Main Close Button” on the right side, and click to enable it.
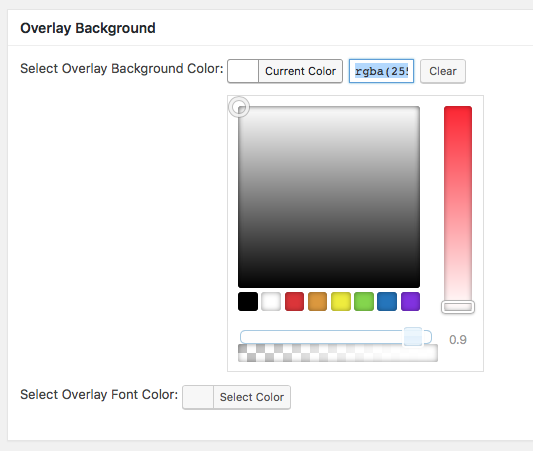
Next, we’ll need to add the background color for the overlay. So find the Overlay Background Colorop settings meta box, and paste in this value: rgba(255,255,255,0.9)
This will give it the transparent white background just like the ET popup videos.
Okay, the last thing we need to do is change the overlay animation to the “Scale” animation to make it more like the animation on the ET site. Once you’ve done that, go ahead and click Publish!
Setting Up the Video Pop Up Click Trigger in Divi
Now that the overlay is created, we need to set up the click trigger on a Divi page (or post, custom post type, etc).
As a sidenote, you could also set an automatic trigger instead of a click trigger too. But for this example we’re setting a click trigger.
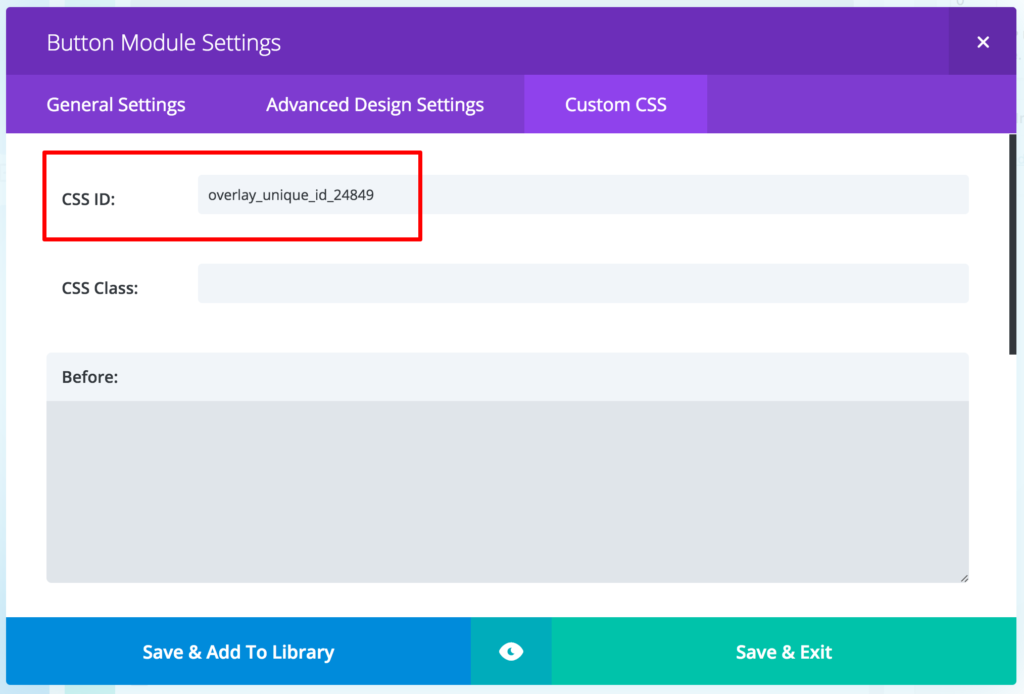
So navigate to the page you’d like to trigger it from, and open up the module. In this example, we’ll set up the click trigger on a button, but you can set the click trigger to anything. You can consult the Divi Overlays docs for more guidance on this. Navigate to the Custom CSS tab, and paste the unique overlay ID (which can be found on the overlay edit screen or the overlay overview screen) into the CSS ID field of the Divi module, as shown below.
Click, Save, then Publish, and you’re done! Admire the beautiful popup overlay you just created with Divi and Divi Overlays WITH a beautiful animated call to action too 🙂
Now for some customization to make it your own…
Customizing the Divi Pop Up Video Layout to Fit Your Brand
Okay so the default in the layout is great. But you’re going to more than likely want to customize it for your own needs. So I’m going to show you how to do that now.
First, navigate back over to the overlay and open up the top module labeled “Video Embed Code + Custom Close Button.”
Copy your unique video ID from your YouTube video (as shown below):
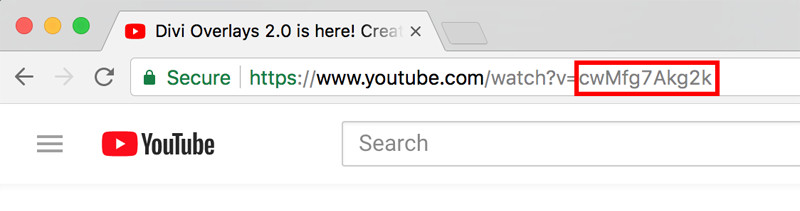
The ID is everything after the equal sign like shown in red above.
You’re going to paste that into the code module where the YouTube embed code is found. You’ll replace everything after the embed/ and before the ?
Now your video is added to the on click popup! 🙂
Next, let’s customize the button. You can open up the next module down, which is a button module. You can customize the Button Text and Button URL just like you would in any other button module. The only thing you can’t customize is the button background color, and that’s because it’s added via CSS in order to have it animate.
So to customize the colors, open up the last module which contains the custom CSS. Also, you can optionally move this custom CSS to your Divi Theme Options custom CSS box, or your stylesheet. Just be sure to remove the <style> tags at the beginning and end. You can also leave it in the builder how it is now too.
Now to customize the colors, find the CSS for the keyframes (should be at the end). These keyframes show the progression of the animation, and show the different background color changes. So you can simply change the colors to whatever colors you’d like, and you’ll see the changes reflected on the front end.
That’s it! Be sure to check out part two of this tutorial where we rebuild the top section of the Divi landing page, AND you can download the layout for free too!
Like this layout and instructions! Will be using this layout soon. Keep them coming.
Awesome, glad you like it! And yes more layouts to come 🙂
Do you mean the rollover play button will be in part 2? Wasn’t sure, I really like that!
Yep, exactly! In part two, we’ll be recreating the section from the demo site (the top section from the Divi landing page), and then giving it away as a free layout 🙂
The layout isn’t in my downloads section – any advice please?
Hey Jon,
The layout should be in the downloads section for all Divi Overlays customers. If it’s not, please open a support ticket and we’ll into it further. Thanks!
Well, that was simple. Looks good in mobile as well.
Great!! 😊👍🏻
Hi Tim, how do I use local mp4 in stead of Youtube?
It’s highly recommended to not host your videos yourself as it takes up significant server resources. If it needs to be private, you can create a private YouTube video that isn’t able to be searched or shown on your page. But if you must do local, you can simply replace the YouTube embed code with an iframe embed code with your video’s direct URL as the src file.
Hi Tim!
The video keeps jumping up and down in the overlay for me – any idea what could be the issue?
Other than that – such a great job, the tutorials are just amazing! Thank you! 🙂
Hi Daniela,
For some reason, with a recent update to Divi, this started happening. It’s because of the CSS code in the template, not because of Divi Overlays overall. More specifically, it’s the keyframes. If you remove those it will immediately fix the problem. If you have more questions, open a support ticket and we can help you out 🙂
Love this! I tried using a Vimeo video but the settings are pushing the video to the bottom of the screen. Are there instructions for Vimeo?
Hmm that’s odd. That didn’t happen previously. Maybe open a support ticket and we can take a look for you!
I have purchased this plugin but cannot get to any of the templates that the video describes. The link above to Divi Life Account > Downloads returns a 404. Buyer beware until this is fixed.
Hi Dru,
We changed systems so now the downloads are found in a slightly different location. They’re found in Purchase History page in the plugin layout templates tab. Sorry for the confusion.
DOes overlay work with vimeo?
Yes, definitely 🙂
It works great, but how can I change the size of the video area? I can make it smaller but not larger than the default.
How can I make the display smaller?
Change the width in the iframe embed code 🙂