Creating a Divi Masonry Gallery: A Step-by-Step Guide

If you’re looking to add an extra touch of class to your Divi website, a masonry gallery could be just the solution you need!
With a visually appealing layout, responsive design, and extensive customization options, masonry galleries are an excellent choice for showcasing your portfolio, product catalog, or photo collection. These galleries are versatile and can benefit a wide range of industries, from creative professionals such as photographers and designers to eCommerce businesses and event planners.

However, the default Divi Gallery module falls short when it comes to masonry styles, offering only grid and slider layouts. Thankfully, alternative solutions are readily available, and we’ve lined up a couple of options to tickle your creative taste buds.
Here we’ll show you how to overcome Divi Gallery’s limitations, by either adding custom CSS to the default gallery module or by using the masonry gallery module available in our incredible Divi Modules Pro plugin. Let’s go!
How to Create a Masonry Gallery with the Gallery Module and CSS
Tech experts who prefer not to use additional plugins can still achieve a masonry gallery layout in Divi by combining the default Gallery module with custom CSS. This approach offers flexibility and control over the gallery’s appearance, although some technical knowledge is required.
Here’s a step-by-step guide to achieve this:
- Go to Divi > Theme Options > General, and toggle the Enable Divi Gallery button. Save your changes.

- Open the Divi Builder and navigate to the page or post where you want to add the masonry gallery.
- Insert a new section and select a row layout.
- Add the Gallery module to the row.

- In the Gallery module settings, upload or select the images you want to include in the masonry gallery.
- Customize the gallery settings as desired, such as the number of images per page, image size, and pagination.
Head to Divi > Theme Options > General and add the following CSS code snippet to achieve the masonry effect. You can also achieve this through the Advanced tab in Gallery Settings.
.et_pb_gallery_grid .et_pb_gallery_items {
    display: grid;
    grid-template-columns: repeat(3, 1fr);
    grid-gap: 10px;
}
This CSS code targets the .et_pb_gallery_items class, which is the container for the gallery items, and applies the display: grid property to create a grid layout. The grid-template-columns property sets the number of columns (in this case, 3), and the grid-gap sets the gap between the grid items (in this case, 10px).
You can customize the masonry layout by adjusting the CSS settings. For example, to change the number of columns, modify the grid-template-columns property:
grid-template-columns: repeat(4, 1fr); /* Change to 4 columns */To adjust the gap size between the gallery items, change the grid-gap value:
grid-gap: 20px; /* Increase gap size to 20px */After adding the custom CSS, save your changes and preview the gallery on your website. Test the gallery on different devices and screen sizes to ensure it remains responsive. If needed, refine the CSS to optimize the layout for various devices.
Benefits and Drawbacks of Using Custom CSS
Using custom CSS to create a masonry gallery offers some notable benefits, including:
- Flexibility: You have full control over the gallery’s appearance and can customize it to match your website’s design.
- No Additional Plugins: By using CSS, you avoid the need for additional plugins, which can save money, help keep your website lightweight, and reduce compatibility issues.
However, there are also some drawbacks to consider:
- Technical Skills: Working with CSS requires a certain level of technical knowledge. Users without extensive CSS experience may find this approach challenging, and the smallest error can break your site. Tread carefully, or not at all!
- Maintenance: As your website evolves, you may need to update the custom CSS to ensure compatibility with theme updates or changes in your design.
“While achieving a masonry gallery layout with custom CSS is certainly feasible, it demands a certain level of technical proficiency. For users without extensive CSS knowledge or experience, this approach may not be the most efficient or user-friendly solution. Alternative methods, such as using a dedicated masonry gallery plugin, could potentially offer a far more accessible experience.”
– Shafaq O Sheikh, Customer Support Manager at Divi Life
The Better Option: Create a Masonry Gallery with Divi Modules Pro

As we’ve seen, creating a masonry gallery using the default Divi Gallery module and custom CSS can be time-consuming and requires technical expertise. A more efficient solution is to use Divi Modules Pro, which we’ve designed for everyone to use.
This nifty plugin offers a dedicated Masonry Gallery module alongside other extremely useful modules such as a Carousel module, Countdown Timer module, Before and After Slider module, Flipbox module, and more. Divi Modules Pro gives users functionality that simply can’t be found in native Divi.
Divi Modules Pro simplifies the process of creating a masonry gallery with its intuitive design and user-friendly interface. You can easily add, remove, and rearrange images within the gallery without the need for custom CSS or complex coding work.

You’ll gain the following benefits from using Divi Modules Pro on your website:
- Comprehensive features: The Masonry Gallery module comes packed with advanced features that allow for extensive customization. You can adjust column counts, spacing between images, lazy load settings, and more, giving you full control over the gallery’s appearance and functionality.
- Performance optimization: A dynamic asset loading feature ensures that only the necessary CSS and JavaScript files are loaded for the modules you’re using on a specific page. By optimizing resource loading, Divi Modules Pro helps maintain fast page speeds and improves your overall website performance.
- Responsive design: The Masonry Gallery module is fully responsive and optimized for various screen sizes. Whether your visitors are accessing your website from a desktop, tablet, or mobile device, the gallery will adapt, ensuring a consistent and visually appealing experience across all devices.
By choosing Divi Modules Pro, you can save time, avoid technical complexities, and create stunning masonry galleries with ease!
Step-by-Step Guide to Creating a Masonry Gallery with Divi Modules Pro
Creating a stunning masonry gallery with Divi Modules Pro is a straightforward process. Follow this detailed guide to set up your gallery without breaking a sweat.
1. Install Divi Modules Pro
- After purchase, download the Divi Modules Pro plugin from the official website.
- In your WordPress dashboard, navigate to Plugins > Add New.
- Click on the Upload Plugin button at the top of the page.
- Choose the downloaded Divi Modules Pro zip file and click Install Now.
- After installation, click on Activate.
For more detailed instructions, refer to our Divi Modules Pro Documentation.
2. Create a New Page or Post
- In your WordPress dashboard, navigate to Pages > Add New or Posts > Add New, depending on where you want to add your masonry gallery.
- Give your page or post a title and click on the Use Divi Builder button.

3. Add the Masonry Gallery Module
- In the Divi Builder, click on the + icon to add a new module.
- Search for Masonry Gallery in the search bar or locate it under the Divi Modules Pro section.
- Click on the Masonry Gallery module to add it to your page.

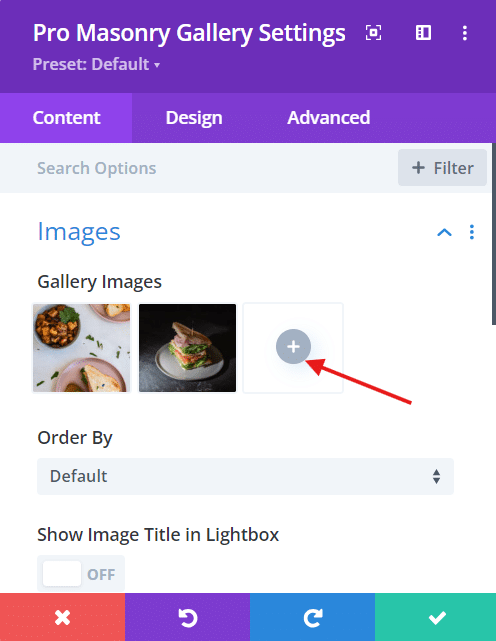
4. Configure the Gallery Settings
- In the Masonry Gallery module settings, click on the Upload an image button to add images to your gallery.
- Adjust the number of columns in the Column Count setting to control how many images appear in each row.
- Set the spacing between images using the Gutter Width setting.
- Customize the appearance of the gallery by adjusting colors, fonts, and other design settings to match your website’s branding.

5. Optimize for Different Devices
- In the Masonry Gallery module settings, navigate to the Advanced tab.
- Under the Responsive section, you can adjust the column count and gutter width for different screen sizes (desktop, tablet, and phone).
- Preview your page on various devices to ensure the gallery shines and make any necessary adjustments.


6. Save and Publish
- Once you’re satisfied with your masonry gallery’s appearance and settings, click on the Save button in the Divi Builder.
- Click on the Publish or Update button to make the changes live on your website.
Simple, right? Why spend time wrestling with code when our super plugin can handle the job for you?
Launch Your Stunning Divi Masonry Gallery Today
As we’ve seen, masonry galleries are a super-useful way to boost your website’s visual appeal and keep your audience engaged. By showcasing images in a dynamic, space-efficient layout, you can create captivating designs to wow your visitors. Divi Modules Pro makes the process easy while offering superior customization.
Why wait to give your website an epic makeover? Our setup process is quick and intuitive, allowing you to have a professional-looking gallery live in no time. Add to this dynamic asset loading for lightning-fast page times, and ongoing updates and support, and you can be confident that your gallery will always perform at its best.
Create stunning masonry galleries in minutes by trying Divi Modules Pro today!

Divi Modules Pro
Get Divi Modules Pro & Access Dozens of Interactive Creative Design Modules

0 Comments