Creating Urgency with Divi’s Countdown Timer: A Step-by-Step Guide
Countdown timers are particularly effective for product launches, flash sales, and event promotions, where time is of the essence. So how do you add these to your own workflows? Well, if you’re a Divi user, you have got a range of options at your disposal.
The Divi builder comes equipped with a built-in Countdown Timer module, offering a straightforward way of adding this feature to your website. While the native module provides basic customization options, users seeking complete design control may find its limitations restrictive.
In this exploration, we’ll delve into the default Divi countdown timer’s features and how you can implement advanced customizations using CSS. For an even better solution, we’ll introduce you to the Countdown Timer in our Divi Modules Pro plugin This is the easiest way to create stunning countdowns on your Divi website.
How to Set up Divi’s Native Countdown Timer
Before setting up the Divi Countdown Timer, ensure you have the Divi builder installed and activated on your WordPress website. If you haven’t done so already, follow Divi’s guide to installing the Divi Builder, and you’re ready to get busy with Divi.
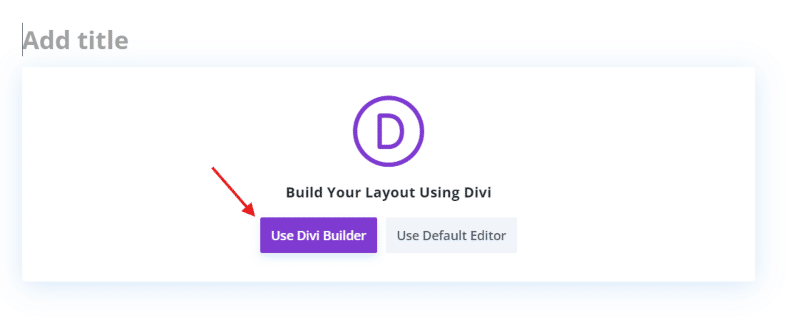
To get started, create a new page in your WordPress dashboard and click the purple Use Divi Builder button, found underneath the page title.
This will load the Divi Visual Builder, presenting you with three options:
- Build From Scratch
- Choose A Premade Layout
- Clone Existing Page
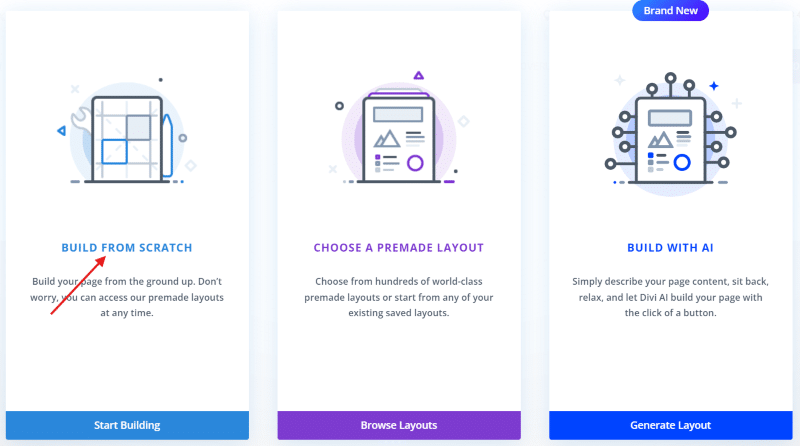
For this tutorial, we’ll select Build From Scratch to start with a blank canvas.
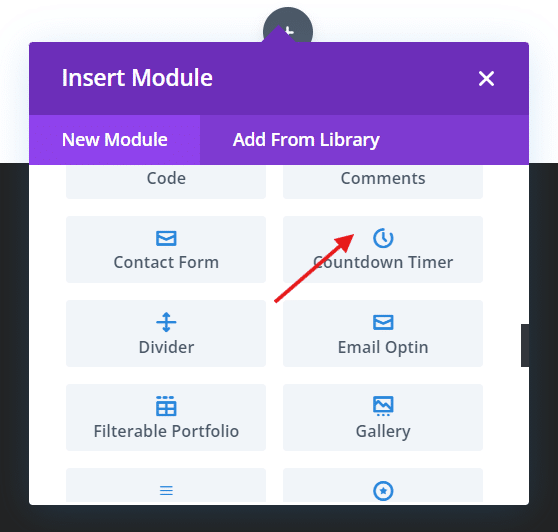
Once the Divi Builder is loaded, you’ll see a default section and row. To add the Countdown Timer module, click the + icon inside the row to open the Divi Module Library. Scroll down until you find the Countdown Timer module, or use the search bar at the top to locate it.
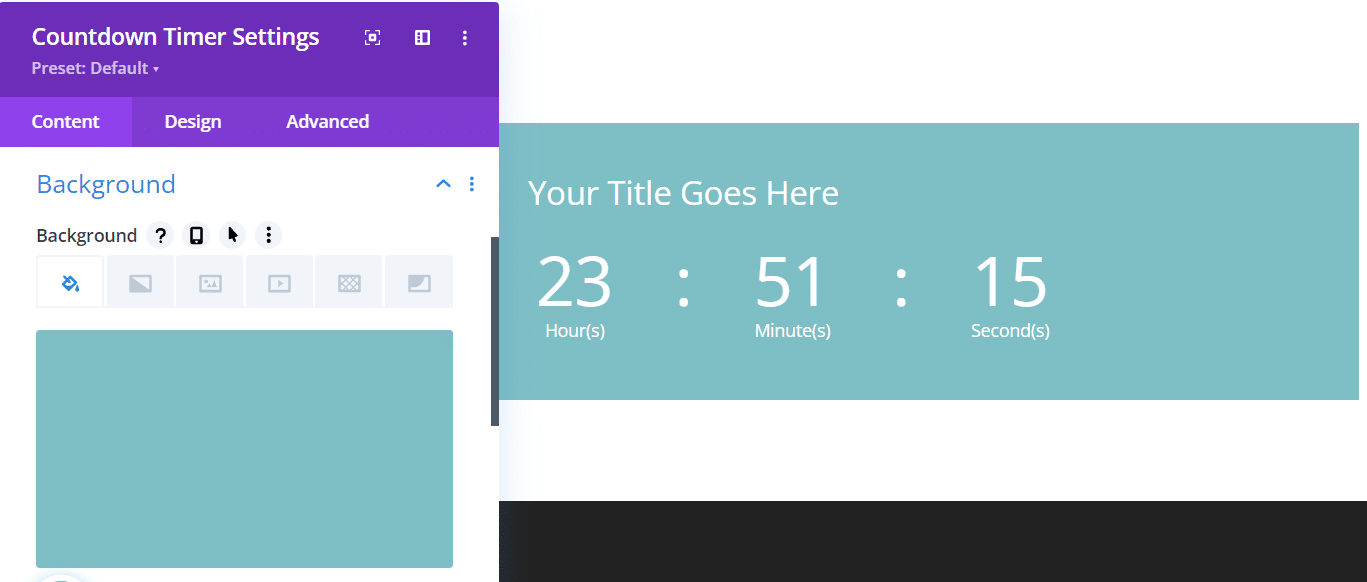
After adding the Countdown Timer module, module settings will automatically appear, divided into three tabs:
- Content
- Design
- Advanced
In the Content tab, you can enter a title for your timer and set the target date and time using the calendar and sliders.
If you want to link the entire module to a specific URL – such as a product page or event registration – you can do so in the Link section of the Content tab. Simply paste the desired URL into the Module Link URL field and choose whether the link should open in the same window or a new tab.
Moving on to the Design tab, you’ll find a variety of options to customize the appearance of your countdown timer. You can adjust the background color, font styles, text colors, and more to match your branding. The module also allows you to control the spacing and alignment of the timer elements.
For experienced users, the Advanced tab offers additional settings such as custom CSS classes, visibility options, and animation effects. These settings provide even greater control over the countdown timer’s appearance and behavior.
Native Customizations Possible with Divi’s Countdown Timer
Now you’re all set up, it’s time to have some fun! Divi’s Countdown Timer module offers a wide range of customization options to bring it in line with your website’s design. Let’s take a look at the various styling possibilities available.
Styling Options
One of the most important aspects of styling your countdown timer is ensuring that it matches your website’s typography. Divi makes this easy by allowing you to change the font family, size, color, and style for each element of the timer. To access these settings, simply open the module settings and navigate to the Design tab. Under the Text section, you’ll find options for customizing the header text, numbers, labels, and separator.
Background Customizations
The background of your countdown timer is part of its overall visual appeal, so be sure to give it some attention. Our background options include solid colors, gradients, images, videos, patterns, and masks. To add a background, head to the Content tab in the module settings and locate the Background section. Choose your desired background type and customize it to suit your needs. For example, subtle gradients can be used to add depth, or you can include images for context.
Border Customizations
Borders can make your countdown timer stand out on the page. With the default countdown timer, you can adjust color, width, and radius to create unique styles. In the Design tab of the module settings, look for the Border section to make any customizations. Use them strategically to draw attention to your timer and create a sense of separation from other page elements.
Text Alignment and Spacing
Before you get lost in design, take a little time to align text and adjust text spacing so your countdown is readable and visually appealing. These settings can be found under the Design tab in the Alignment and Spacing sections.
Centering your timer can create a balanced, symmetrical look, while left or right alignment may be suitable for integrating the timer with other page elements. Experiment with different features to give your timer some wow factor.
Examples of How to Implement Advanced Customizations with CSS
So you’ve mastered Divi’s countdown timer’s native customizations – what next? Well, experienced Divi users can take things up a notch through CSS customizations. These let you take your designs to the next level with tailored styles, including the ability to:
Add a Custom Class to the Countdown Timer
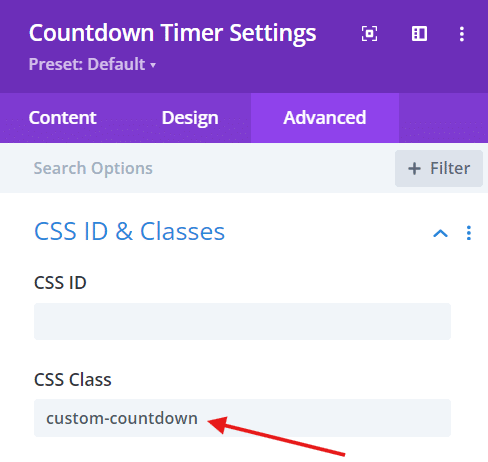
To target specific styles to your countdown timer, you’ll first need to add a custom CSS class to the module.
How to Add a Custom CSS Class to The Module
- Open the Countdown Timer module settings in the Divi Builder.
- Navigate to the Advanced tab and locate the CSS ID & Classes section.
- In the CSS Class field, enter a unique class name, such as custom-countdown.
- Save your changes.
Change Background Color, Padding, and Border Radius
One way to make your countdown timer stand out is by customizing the background color, padding, and border radius of the tiles. Use the following CSS snippet to achieve this.
Change Background Color, Padding, and Border Radius
.custom-countdown .values {
    background-color: #da181f; /* background color of each tile */
    padding: 15px 0px 25px 0px; /* padding of the tiles */
    border-radius: 7px; /* border radius of the tiles */
}
In this code, .custom-countdown targets the specific countdown timer with the custom class we added earlier. The .values selector targets each individual tile. The background-color property sets the background color of the tiles, while padding adjusts the space inside the tiles. The border-radius property controls the roundness of the tile corners.
Hide the Separator Colon and Adjust Font Size
If you want to create a cleaner, more modern look for your countdown timer, you can hide the separator colon and adjust the font size of the first digit in the Days field:
Hide the Separator Colon and Adjust Font Size
.et_pb_countdown_timer .section.days p.value:first-letter {
    font-size: 0px;
    vertical-align: top;
}
This CSS targets the first letter of the Days value using the :first-letter pseudo-element. By setting the font size to 0px, we effectively hide the first digit (which is often an unnecessary leading zero). The vertical-align: top property ensures the hidden digit doesn’t affect the vertical alignment of the remaining digits.
Understanding the Limitations of the Native Divi Countdown Timer
While the native module provides a good foundation for adding a basic countdown to your website, it may not be sufficient for advanced users. The timer has several limitations which may frustrate some creatives, so let’s look at these in detail.
- Lack of advanced features: The module does not allow you to pause the countdown between the end and start times, which can be crucial for creating a sense of urgency and encouraging users to take action.
- No custom actions on the timer end: The timer does not allow you to set custom actions when the countdown reaches zero, such as hiding the timer, redirecting to another URL, showing a message, or displaying a button. These features can help to guide users through the conversion process.
- Limited customization options: While you can adjust basic settings like font styles, colors, and spacing, the native module lacks the depth of design needed to create a truly unique countdown timer. This can make it challenging to integrate the timer with more design-heavy website branding.
These limitations can impact the user experience and even conversion rates. Users could find the timer intrusive or ignore it altogether, and a lack of advanced features may lead to missed opportunities for driving sales.
“Countdown timers are a powerful tool for creating a sense of urgency and driving conversions on your website. By visually displaying the limited time remaining for a special offer or event, you can tap into people’s innate fear of missing out and motivate them to take action quickly. However, Divi’s default countdown timer has some significant limitations. It lacks advanced customization options, doesn’t allow you to specify what happens when the timer reaches zero, and simply sits there awkwardly once the countdown ends.”
– Shafaq O Sheikh, Customer Support Manager at Divi Life
To overcome these limitations and create a countdown timer that truly captures your audience’s attention, let’s consider some alternatives to the native Divi module.
The Better Solution: Divi Modules Pro by Divi Life
For anyone looking for a more feature-rich solution for customizing countdown timers, our fabulous Divi Modules Pro plugin offers an ideal solution!
Features Available in the Divi Countdown Timer Pro Module
Countdown Date/Time Options
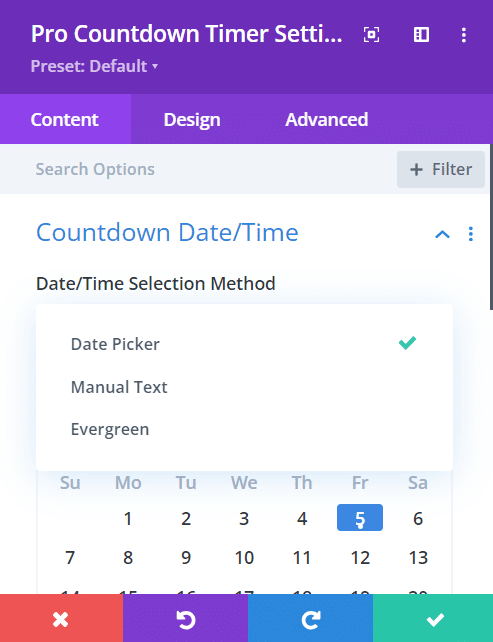
- Date Picker: Easily select a specific date and time.
- Manual Text: Manually enter the desired date and time for your countdown.
- Dynamic Content: Use dynamic content to select a custom field containing the date and time for even more flexibility.
- Evergreen Timer: An evergreen timer always counts down the same amount of time for each user, rather than counting down to a specific date. This can create a sense of urgency for limited-time offers or promotions. The Date/Time Selection Method defaults to the Date Picker option, so click on the drop-down menu to change it.
Alt text: Divi’s Countdown Timer Pro settings
Timer Ending Events
- Continue the Clock: After reaching zero, the timer starts counting up.
- Stop the Clock: The timer simply stops at zero and does nothing else, allowing for a straightforward ending.
- Forward to a URL: You can automatically redirect users to a specific URL after the timer ends, such as a ‘sale ended’ page.
- Stop the Clock and Execute JS: Advanced users can execute custom JavaScript after the timer ends for even further customizations.
- Stop the Clock and Replace with HTML: Users can display custom HTML code after the timer ends, allowing for personalized messages or CTAs.
Customization Options
- Custom Format: Adjust the semantic format of the countdown to match your preferences.
- Countdown Text Style: Style the text of the countdown timer to align perfectly with your website’s design.
- Clock Design: Customize the background, color, and size of the countdown, and choose from pre-built styles such as the eye-catching FlipClock and BlockClock!

- Sizing: Easily change the width and height of the module to fit into your layout.
For an in-depth look at setting up the module and its features, immerse yourself in our guide to using the Divi Countdown Timer Pro Module.
Using the Countdown Timer Pro Module with Dedicated Layouts by Divi Life
For those needing complete control over their countdown timers, we offer an exclusive Countdown Timer Module Layout Pack to complement the Pro Module. This pack is exclusively available to Divi Life All Access Pass members and includes 20 unique and visually stunning layouts.
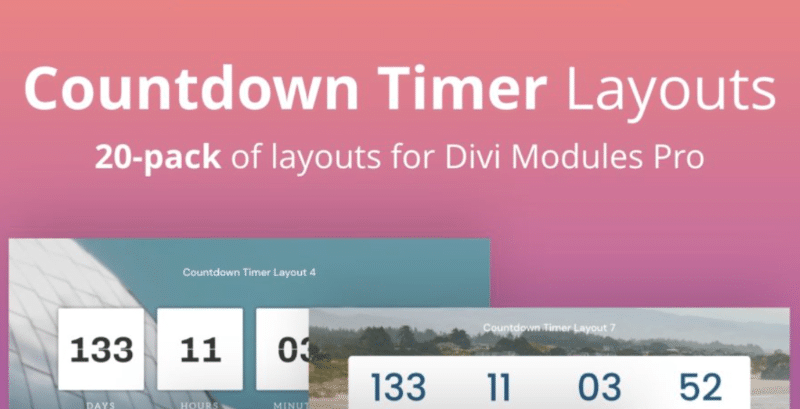
Each layout is fully customizable, giving you the flexibility to adapt them to the specific needs of your brand. The pack covers a wide range of styles and use cases, from sleek and modern designs for product launches to festive layouts for holiday sales. Using pre-designed layouts can save users valuable time creating timers, while still achieving professional-looking results.
To access these layouts, simply log in to your Divi Life Customer Portal and navigate to the All Access Pass Downloads section. From there, you can easily import the layouts into your Divi Library and start using them immediately with the Countdown Timer Pro Module.
Another Solution: Create Customized Countdown Bars with Divi Bars
That’s right – we’ve got another countdown solution for you! Allow me to introduce you to our Divi Bars plugin. This user-friendly solution allows you to create highly customizable bars – including countdown timers – that integrate with Divi.

An extensive range of customization options enables you to craft countdown bars that perfectly align with your branding and design. You can easily adjust colors, fonts, and styles to ensure your countdown bar complements your site’s overall look and feel.
Our plugin also offers flexibility in terms of placement and size, allowing you to position your countdown bar for maximum impact, whether that’s at the top, bottom, or as a slide-in element.
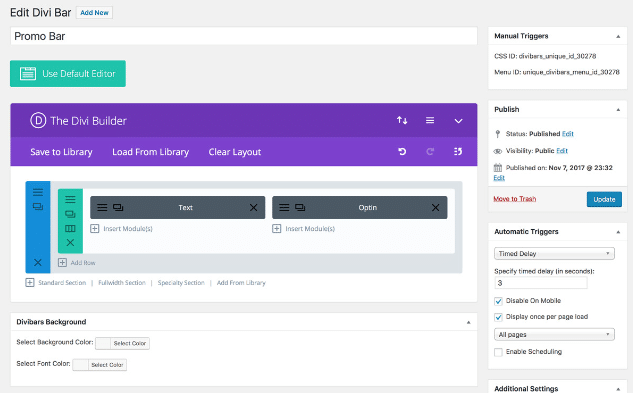
You can incorporate text, eye-catching images, or strategically placed CTA buttons to further drive engagement and boost conversions. Divi Bars also offers various animation and effect options, helping your timer shine on the page. It may not offer quite the number of options found in the Pro Module’s timer, but if you’ve got a real need to create notification bars for timers, announcements, and other use cases, then this is the one to go for.
Boost Your Conversions with Urgency: Get started with Divi Modules Pro
In this article, we’ve explored the features available to get the most out of the default module, but we’ve also highlighted the countdown timer in Divi Modules Pro as a more powerful solution.
With its advanced customization options, multiple timer-ending events, and integration with dedicated layouts, Divi Modules Pro is the platform for creating urgency and boosting conversions on your website.
Don’t let the limitations of the default Divi countdown timer hold you back – get started with Divi Modules Pro today and add some urgency to your own projects!

Divi Modules Pro
Get Divi Modules Pro & Access Dozens of Interactive Creative Design Modules
Table of Contents
- How to Set Up Divi’s Native Countdown Timer
- Native Customizations Possible With Divi’s Countdown Timer
- Examples of How to Implement Advanced Customizations with CSS
- Understanding the Limitations of the Native Divi Countdown Timer
- The Better Solution: Divi Modules Pro by Divi Life
- Another Solution: Create Customized Countdown Bars with Divi Bars
- Boost Your Conversions With Urgency: Get Started With Divi Modules Pro


0 Comments