Setting Up Contact Forms with Divi

Contact forms are a major lead generation tool, but for Divi designers, relying on the native Contact Form module can be a mixed bag. While it’s a convenient starting point, too often forms break, emails go undelivered, or the design simply fails to inspire visitors to reach out.
Setup issues can sometimes cause problems with the module, but even discounting these, the native form simply isn’t that inspiring. A good contact form needs to have visual appeal in order to trigger engagement, and the extensive customization required is time-consuming and limited in scope.
We’re going to show you how to get the most out of Divi’s native contact form, along with a guide to using pre-built layouts with the nifty Divi Bricks. Turn your forms into some serious eye-candy and you’ll soon be reaping the benefits when those leads start coming in!
Key takeaways
- Understanding the root causes of delivery failures is a boost for business leads.
- Customizing both the design and logic of your forms improves user experience.
- Integrating advanced spam protection keeps your forms secure without adding friction for genuine users.
- Testing your form and submitting real entries is the only way to guarantee a dependable performance.
- Pre-designed layouts, such as those from Divi Bricks, help ensure your forms are optimized for conversions.
How to create a reliable Divi Contact Form in minutes
Setting up a reliable contact form in Divi 5 is straightforward, but a few key steps will ensure your form looks professional and delivers messages every time.
1. Add the Contact Form module

Start by opening the Visual Builder on your chosen page. Click the blue + icon to add a new section, the green icon to select a row, then the black icon inside the row to add a module. Search for ‘Contact Form’ and select it. The module will appear with default fields – Name, Email, and Message.

2. Configure the email field for reliable delivery

In the module settings, go to the Content tab. Enter the email address where you want submissions sent in the Email field. Use a business email address you check regularly. If you want to send notifications to multiple addresses, separate them with commas. Double-check this setting to avoid missed inquiries.
3. Set a descriptive subject line

Still in the Content tab, find the ‘Message Pattern’ or ‘Subject’ field. Create a subject line like ‘New Inquiry from [Your Site Name]’ so you can spot form submissions easily in your inbox. This small step makes managing responses much simpler.
4. Craft an effective success message
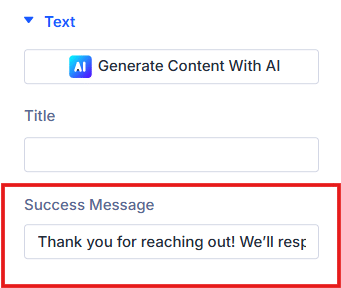
Go to Content > Text > Success Message to confirm receipt and set expectations. For example: ‘Thank you for reaching out! We’ll respond within 24 hours.’ This reassures users that their message was received and tells them when to expect a reply.
5. Add and customize fields
Click ‘Add New Field’ to include more fields, such as phone number or dropdowns for inquiry type. You can make fields required or optional and rearrange their order. Use clear labels and placeholders for a better user experience.
6. Apply conditional logic (optional)
Divi 5 supports conditional logic for fields. For example, show a ‘Budget’ field only if the user selects ‘Project Inquiry’. This keeps your form clean and relevant.
7. Style the form for your brand
Switch to the Design tab. Here, you can:
- Adjust field styles: Change fonts, colors, and spacing for better readability.
- Customize the background: Add a color, gradient, or image to match your site’s look.
- Style the button: Change button color, shape, and hover effects to fit your branding.
- Refine spacing and borders: Use padding, borders, and box shadows for a polished appearance.

8. Test your form
Always submit a test entry to check email delivery and confirm that the success message appears. Review the form on desktop and mobile to ensure it looks great everywhere, and you’re good to go!

How to get even better results with Divi Bricks’ Contact Form layouts

While Divi’s native Contact Form module is a decent starting point, Divi Bricks takes your forms further with pre-designed layouts that are built for higher conversion rates and a better user experience.
If you’re tired of wrestling with spacing, alignment, or uninspired design, Divi Bricks offers a shortcut to professional results, with no advanced design skills required.

Divi Bricks provides over 500 layouts, including a wide selection of contact sections. These layouts are engineered using proven design principles.

According to Nielsen Norman Group, well-designed forms see up to 78% completion rates on the first attempt, compared to just 42% for poorly designed forms.

Divi Bricks layouts are crafted to guide users through the submission process, reducing friction and boosting conversions. Add Divi Bricks to your box of tricks, and you’ll gain the following:
- Pre-styled layouts with optimized spacing, alignment, and visual hierarchy. Users are naturally guided from field to field, increasing the likelihood of completed submissions.
- Professional touches like floating labels, animated fields, and prominent call-to-action buttons. These elements grab attention and encourage engagement.

- Contact sections that combine the form with supporting content – maps, contact details, and even testimonials – to build trust and credibility.
- All layouts are mobile-optimized, ensuring your forms look sharp and function perfectly on any device.
Fast customization in action
Let’s say you choose a Divi Bricks contact section that features a two-column layout – the form on one side, your business info on the other.

After importing, you can:
- Swap in your brand colors and fonts using Divi’s Design Variables for instant consistency.
- Adjust field styles, button colors, and background images directly in the Divi Builder.
- Add or remove fields, update placeholder text, and change button text with just a few clicks.
- Drag and drop supporting elements, like testimonials or social proof, to further increase trust.
Here’s a version of the contact form featured above, with some playful customizations:

“With Divi Bricks, you don’t have to start from scratch or settle for generic designs. Each layout is crafted to help you capture more leads and present a polished, professional image. Forms look great and work harder for your business – all in a fraction of the time it would take to design from the ground up!”
– Jennifer Rodriguez, Lead Designer at Divi Life

Save Time With Divi Bricks!
Like LEGO bricks for your website: Divi Bricks includes thousands of section layouts (aka "bricks") that you can use to mix & match while building Divi websites.
Troubleshooting common issues with Divi Contact Forms
Even with a well-designed contact form, issues like undelivered emails or spam can disrupt communication and cost you business. Here’s how to tackle these common problems.
Why your Divi contact form emails aren’t being delivered (and how to fix it)
If your Divi contact form emails aren’t reaching your inbox, you’re not alone. This is a widespread issue, but it’s rarely caused by Divi or even WordPress itself.
The real culprit is usually your web server, which isn’t optimized for sending emails. Most hosts use PHP’s wp_mail() function, which lacks authentication and often lands your messages in spam or blocks them entirely. The best way to ensure reliable delivery is to route your emails through a dedicated SMTP service like SendGrid, Mailgun, or similar.

This bypasses server limitations and improves deliverability. For a step-by-step guide on setting up an SMTP plugin, check out our guide to fixing unsent contact forms, or grab a quick walkthrough with our YouTube tutorial.
Divi Contact Form Not Sending Emails? Quick & Easy Fix!
Adding effective spam protection to your Divi forms
Spam is a constant nuisance for contact forms, but users have several solutions.
- Honeypot field: This fix is an invisible field that traps bots, stopping them from submitting your contact form. Download a built-for-purpose plugin like WP Armour – Honeypot Anti Spam to add this protection. Once downloaded, there’s no setup required – honeypot fields will be automatically added to your Divi forms.

- Basic Captcha: A simple challenge that helps block automated submissions, basic Captcha can also be configured via Content > Spam Protection.
For stronger protection, you can integrate Google reCAPTCHA:

- Go to the Google reCAPTCHA admin console and register your site to get your Site Key and Secret Key.
- In the Divi Contact Form module, open settings, navigate to the Spam Protection section, and select ‘Use Spam Protection Service’.
- Choose reCAPTCHA as your provider, then add your keys. Divi supports both v2 (checkbox) and v3 (invisible), so pick the version that best fits your UX needs.
- Adjust the minimum score for v3 if you find legitimate messages are being blocked.

Alternatively, consider using plugins like Akismet or Cloudflare Turnstile for additional layers of protection, especially if privacy or GDPR compliance is a concern.
Elevate your forms with Divi Bricks’ pre-designed layouts
A well-designed, functional contact form is a must for any Divi website – it’s your direct line to leads, clients, and opportunities. While Divi’s native Contact Form module lets you fine-tune every detail, achieving a polished, conversion-focused result can take time, especially when you’re juggling multiple projects.
Divi Bricks changes the rules. With a vast library of expertly crafted contact form sections, you can implement beautiful, high-converting forms in minutes. Each layout is designed for clarity, trust, and ease of use, and can be customized to match your brand without sacrificing usability or aesthetics. Whether you’re building one site or dozens, Divi Bricks lets you scale your workflow and deliver professional results at speed.
If you’re ready to upgrade your forms and add some extra WOW to your client projects, explore the full range of Divi Bricks’ layouts today.

0 Comments