From Installation to Customization: Your Divi Before After Slider Handbook

All website owners are looking to stand out from the crowd, and adding some interactive elements to your site is a surefire way to do this. It’s a win-win – users will like the visual content, and you’ll definitely love the increase in engagement. Before and after sliders are one way to achieve interaction, as they up the fun factor while providing visual proof of your products to build trust and boost sales.
With a wide range of applications from web design and photography to beauty and fitness, before and after sliders let you make a lasting impression on your customers no matter your business segment. The basic Divi theme doesn’t have such built-in functionality, but you can create stunning results using Divi Modules Pro’s Before & After Slider. Let’s begin!
Introduction to Divi Modules Pro’s Before & After Slider

We created Divi Modules Pro to extend the functionality of the Divi theme, providing a collection of the most useful modules not available in the default Divi builder. As we’ve seen, these modules include the impressive Divi Before & After Slider Module, which offers an extremely easy and customizable way to create these nifty elements on your website. And if site performance is an issue for you, don’t fret – Divi Modules Pro has dynamic assets loading, so everything happens at top speed!
- Vertical and horizontal orientations: Users can choose between vertical and horizontal slider orientations to best fit their website design and content layout.
- Customizable handle and slider line: The module offers extensive options for customizing the handle and slider line, including colors, styles, and sizes. Slider designs can easily be matched with your wider website branding for a cohesive look.
- Responsive and touch-friendly: Our Before & After Slider is fully responsive and touch-friendly, ensuring a smooth user experience across all devices, including mobile phones and tablets.
- Custom labels: Users can easily add and customize labels for the before and after states, with flexibility in terms of font, color, and positioning.
- Starting point adjustment: The module allows users to set the starting point of the slider, giving you control over the initial view of the before and after images. This is particularly useful for highlighting specific aspects of the comparison.
- Container size settings: Users have the ability to set minimum and maximum heights and widths for the slider container, offering greater control over its appearance and layout within the page design.
“While Divi’s flexibility often allows users to customize their sites with code, creating a before and after slider from scratch is a complex undertaking. In this case, using a well-designed plugin like Divi Modules Pro saves time, ensures reliability, and provides a level of polish that would be challenging to achieve through custom coding. For Divi users looking to implement before and after sliders, a specialized plugin is the recommended path to professional results.”
– Jennifer Rodriguez, Lead Developer at Divi Life
Guide to Creating Before & After Sliders with Divi Modules Pro
We built Divi Modules Pro with simplicity in mind, so creating a before and after slider using the plugin is easy, even for the most technophobic users out there!
How to Install and Setup Divi Modules Pro
You can install and activate Divi Modules Pro as follows:
- Purchase Divi Modules Pro and download the plugin zip file.
- In your WordPress admin panel, go to Plugins > Add New Plugin. Click on the Upload Plugin button at the top of the page.
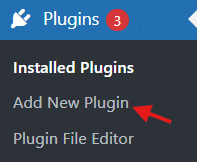
- Click on the Choose File button and select the divi-modules-pro zip file you downloaded.
- Click the Install Now button to upload and install the plugin.
- After installation completes, click the Activate link.

Next up, you’ll need to find your license key. This is emailed to you following the plugin purchase, but you can also find it in the Divi Life Customer Portal under License Keys & Upgrades. To enter your license key, go to Divi > Theme Options > Updates, enter your username and API key, then click Save Changes.

Once you’ve completed that mini-mission, you’re good to go!
Step-by-Step Guide to Creating Your First Slider
To start creating your first slider using Divi Modules Pro, go to the relevant page or post and open the Divi Builder. Click on the ‘+’ icon to add a new module, then search for and select the Before & After Slider module.

- Click on the Upload an image button for the Before image.
- Select the desired image from your media library or upload a new one.
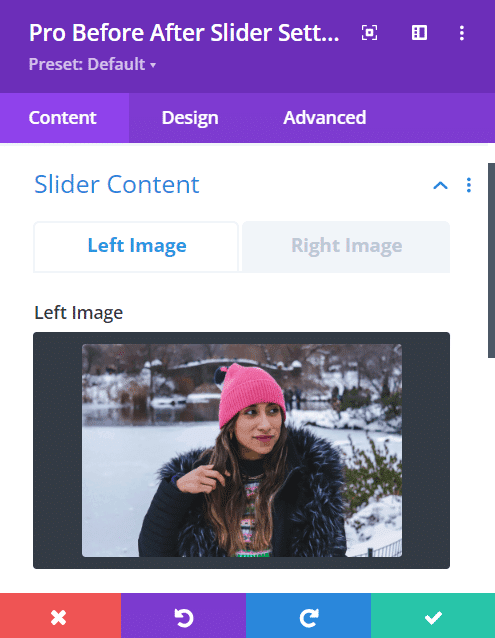
- Repeat the process for the After image.
- Ensure that both images are properly aligned and have the same dimensions to avoid distortion. The fashion brand examples below depict the shift from winter to spring clothing:


After uploading your images, you can adjust their sizes to fit your layout. Our Divi Before & After Slider module automatically resizes the images to maintain their aspect ratio, but you can fine-tune the dimensions in the settings panel. Make sure the images are the same size so the slider’s transition is appealing to the eye. And that’s all there is to it!
Customizing Your Before and After Slider
Seeing as you’re here, you’re no doubt into customization, right? Well, our Divi Before & After Slider module offers some super-neat customization options, allowing you to tweak the slider’s appearance and functionality, and align it with your imagination.
Let’s explore how to customize the slider line, handle, labels, and overlay:
Customizing the Slider Line
To change the color of the slider line, navigate to the Design tab in the module settings and locate the Slider Line Color option. Click on the color picker and select a color that complements your website’s color scheme. You can also enter a specific hex code if you have a particular hue in mind.

Customizing the Handle
Next, let’s customize the handle. In the Design tab, find the Handle Color setting to modify the border color of the handle. Choose a color that provides sufficient contrast against the slider line and background, ensuring easy visibility for users.
You can set the background color of the handle using the Handle Background Color option. Select a color that allows the handle to stand out and encourages user interaction.
Customizing the Image Labels
To change the text of the labels, go to the Content tab in the module settings and locate the Labels field. By default, the labels are set to Before and After, but you can easily customize them to suit your specific use case.
For example, photographers might use labels like Original and Edited, while designers could opt for Old and New. Our fashion example (seen above) uses ‘From winter…’ on the Before side, with ‘…to spring!’ on After.

Customizing the Overlay
The Divi Before & After Slider module allows you to enable or disable the overlay and change its color. In the Design tab, locate the Overlay toggle. If you want to disable the overlay completely, simply turn off the toggle.
To change the overlay color, click on the color picker next to the Overlay Color option and select a color that enhances the visual contrast between the before and after images without overpowering them. Consider using a semi-transparent color to maintain the visibility of the underlying images.

In some cases, disabling the overlay might be beneficial, particularly when the images themselves provide sufficient contrast. This can be especially useful for showcasing detailed or intricate images where an overlay might distract from the content.
Have fun with your customizations and don’t be afraid to try new things! Experiment with different colors, labels, and overlay settings to find combinations that really grab your audience’s attention.
Wow Your Site Visitors with Stunning Before and After Sliders
In the bid to have a site that stands out from those of your rivals, before and after sliders are a notable addition to your toolkit. Here we’ve explored how Divi Modules Pro’s Before & After Slider offers an easy way to implement this feature, improving your site’s visual appeal and potentially boosting engagement rates.
We’ve covered our slider’s versatility in supporting both vertical and horizontal orientations, its ability to customize various elements like the handle and slider line, and its responsive design.
Our step-by-step guide has walked you through the installation process and slider creation, providing you with the knowledge needed to add this engaging element to your site. Follow these instructions and you too can create stunning sliders that align with your brand and delight your customers.
Now it’s time for action! Transform your Divi website into an immersive and engaging experience by trying Divi Modules Pro today.

Divi Modules Pro
Get Divi Modules Pro & Access Dozens of Interactive Creative Design Modules

0 Comments